Hair is one of those many things that doesn't come easy for me, but it got a whole lot easier once I had to teach it to someone else. About a year ago, someone requested that I make tips on how to draw and paint hair, making me really have to think about how I even approach hair when I draw. So for anyone else who wants to leave their characters bald sometimes, here's my cheatsheet for hair, including my own tips and other resources I've collected over the years!
Lion Girl's Cheatsheet for Hair
I'll start by saying that just like with everything else in art, the best way to improve is to observe the real deal (+ other art) and use references. So pay special attention to your or your friends' hair, figure out how artists simplify hair in a way that you like, and watch beauty videos about hair! I don't have recommendations for the latter, but if you're looking for photos to reference, Pinterest is my go-to stop:
Drawing Hair
A large part of learning how to draw is learning how to think about what you draw. It's easy to get overwhelmed when trying to draw hair because your eyes get lost in all the details— the individual strands, flyaway hairs, and frizz. That's why just like mathematicians, artists always have to simplify complicated things. We do it by grouping elements and breaking them down into basic shapes. So when you draw any type of hair:
A large part of learning how to draw is learning how to think about what you draw. It's easy to get overwhelmed when trying to draw hair because your eyes get lost in all the details— the individual strands, flyaway hairs, and frizz. That's why just like mathematicians, artists always have to simplify complicated things. We do it by grouping elements and breaking them down into basic shapes. So when you draw any type of hair:
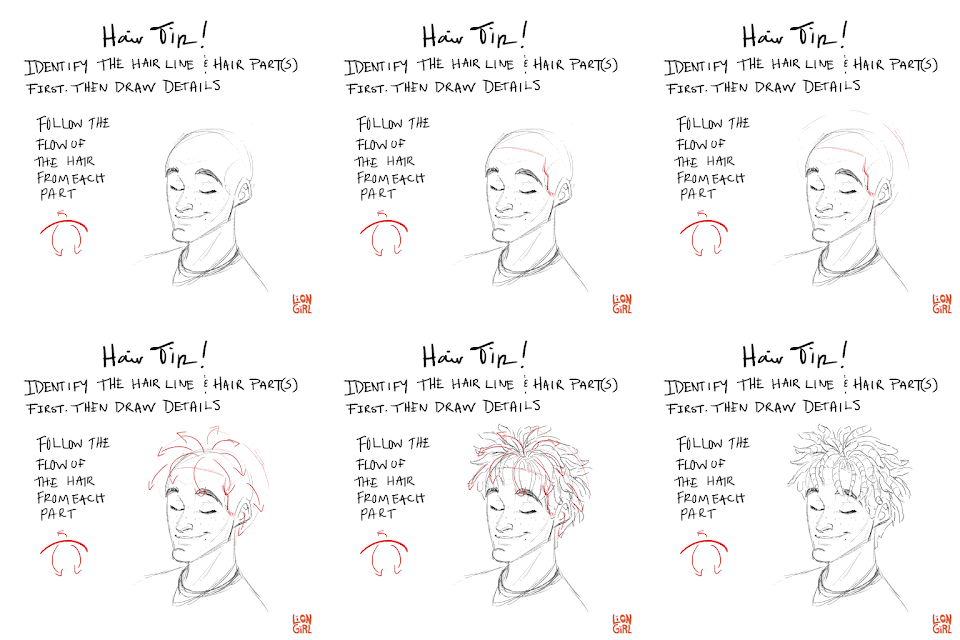
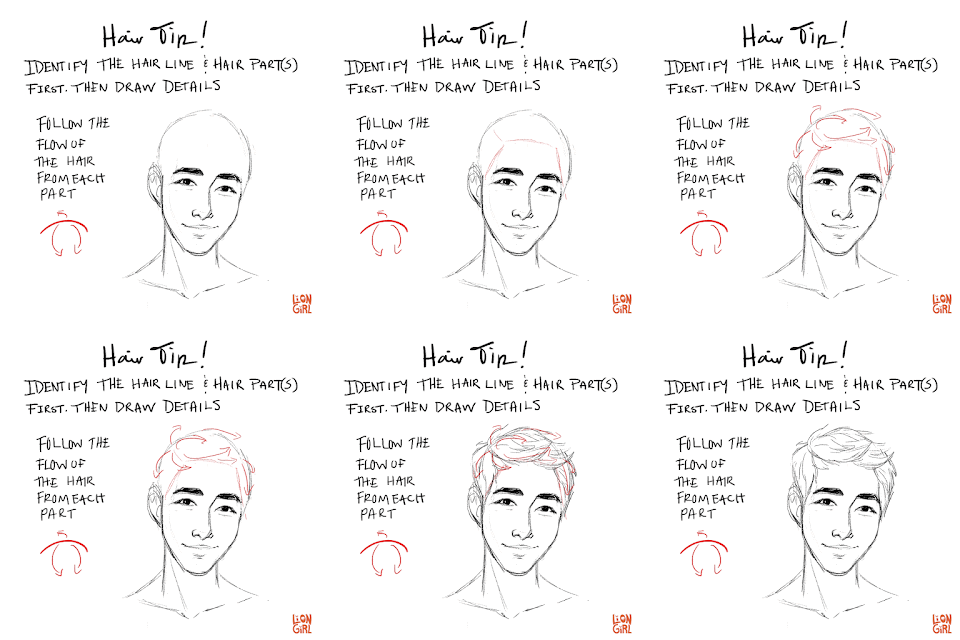
- Start by identifying the hair line & places where the hair parts
- Sketch in the overall shape of the hair as a guide
- Finally sketch in details following the flow (direction) of the hair from each part. Think of hair as the locks that make it up instead of individual strands while you draw.
I don't draw in the red flow lines when I normally work because I'm just visualizing it instead, but you can definitely draw them if you find that it helps!
In art, it's easiest to go from broad and loose ideas to the little details. So with hair, you'll want to work from the hair line, to the hair shape, to the locks of hair, and eventually down to individual hair strands. (Just don't feel the need to draw every little strand). Here's some more examples:


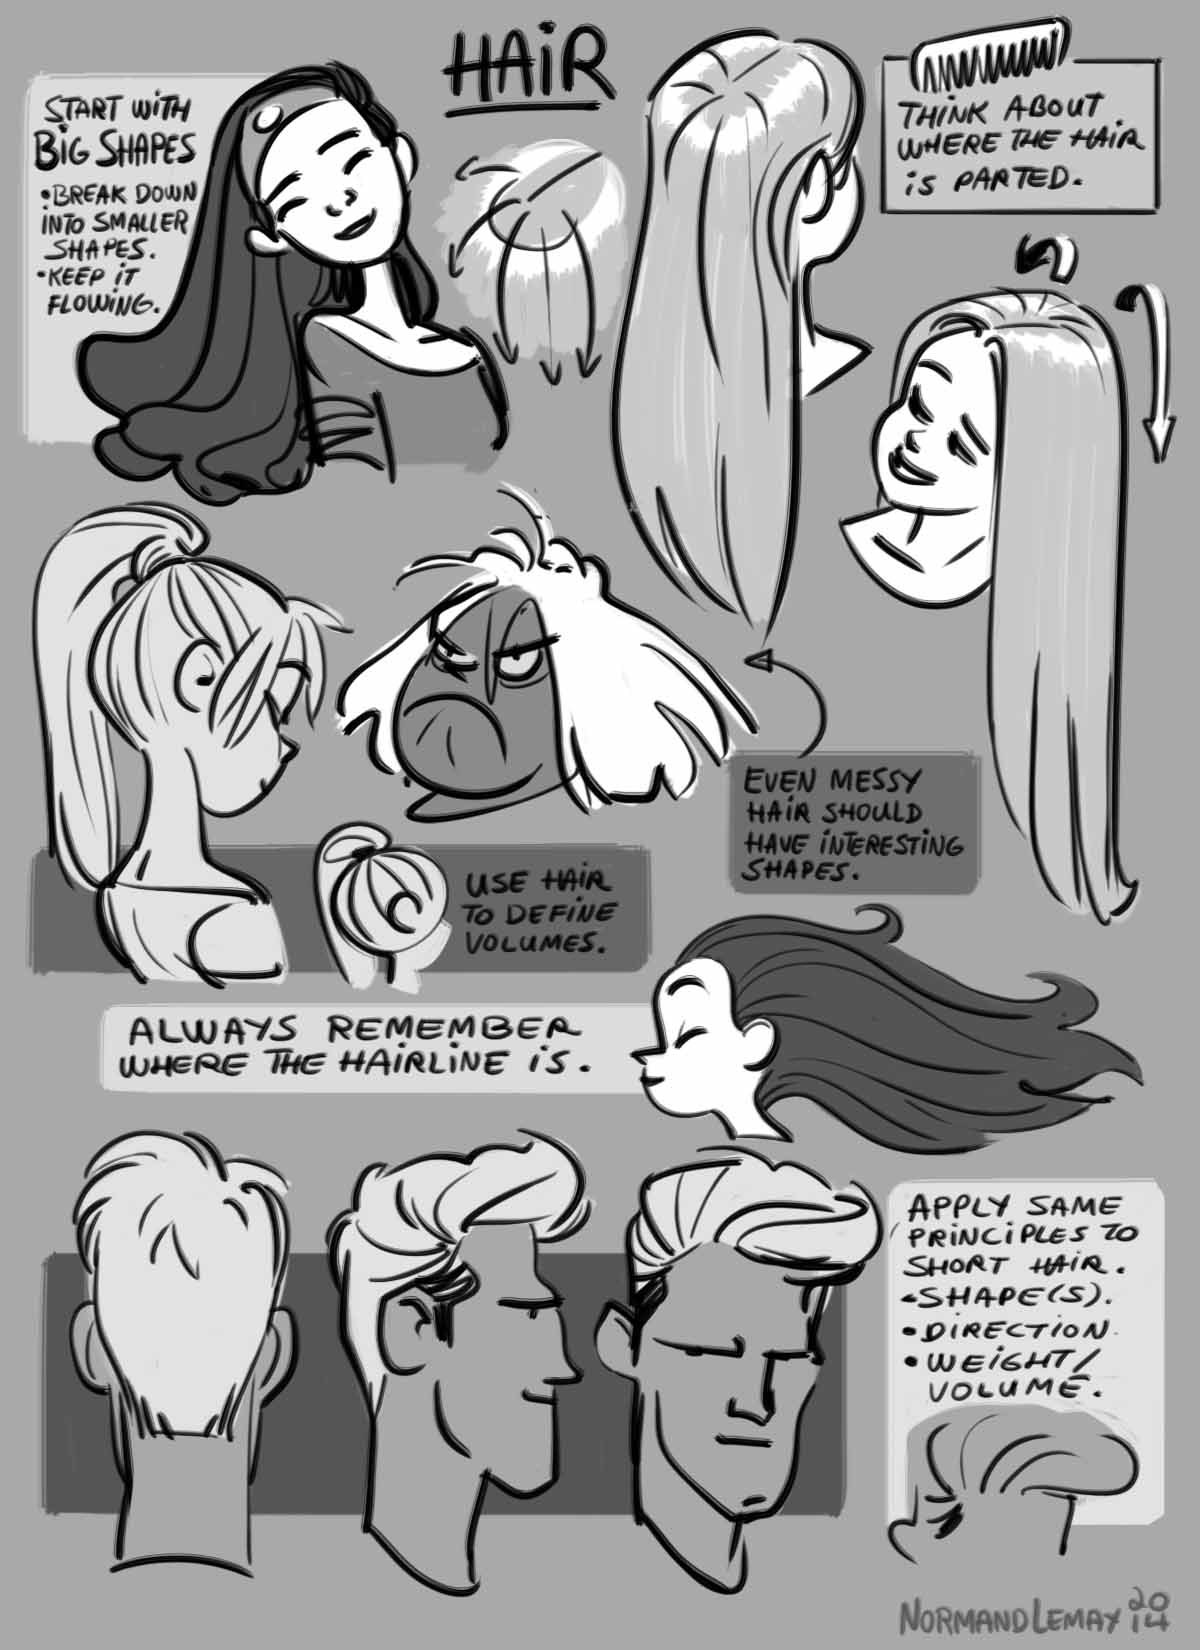
Griz & Norm's Hair Tuesday Tip (follow the link to read Norm's advice!)
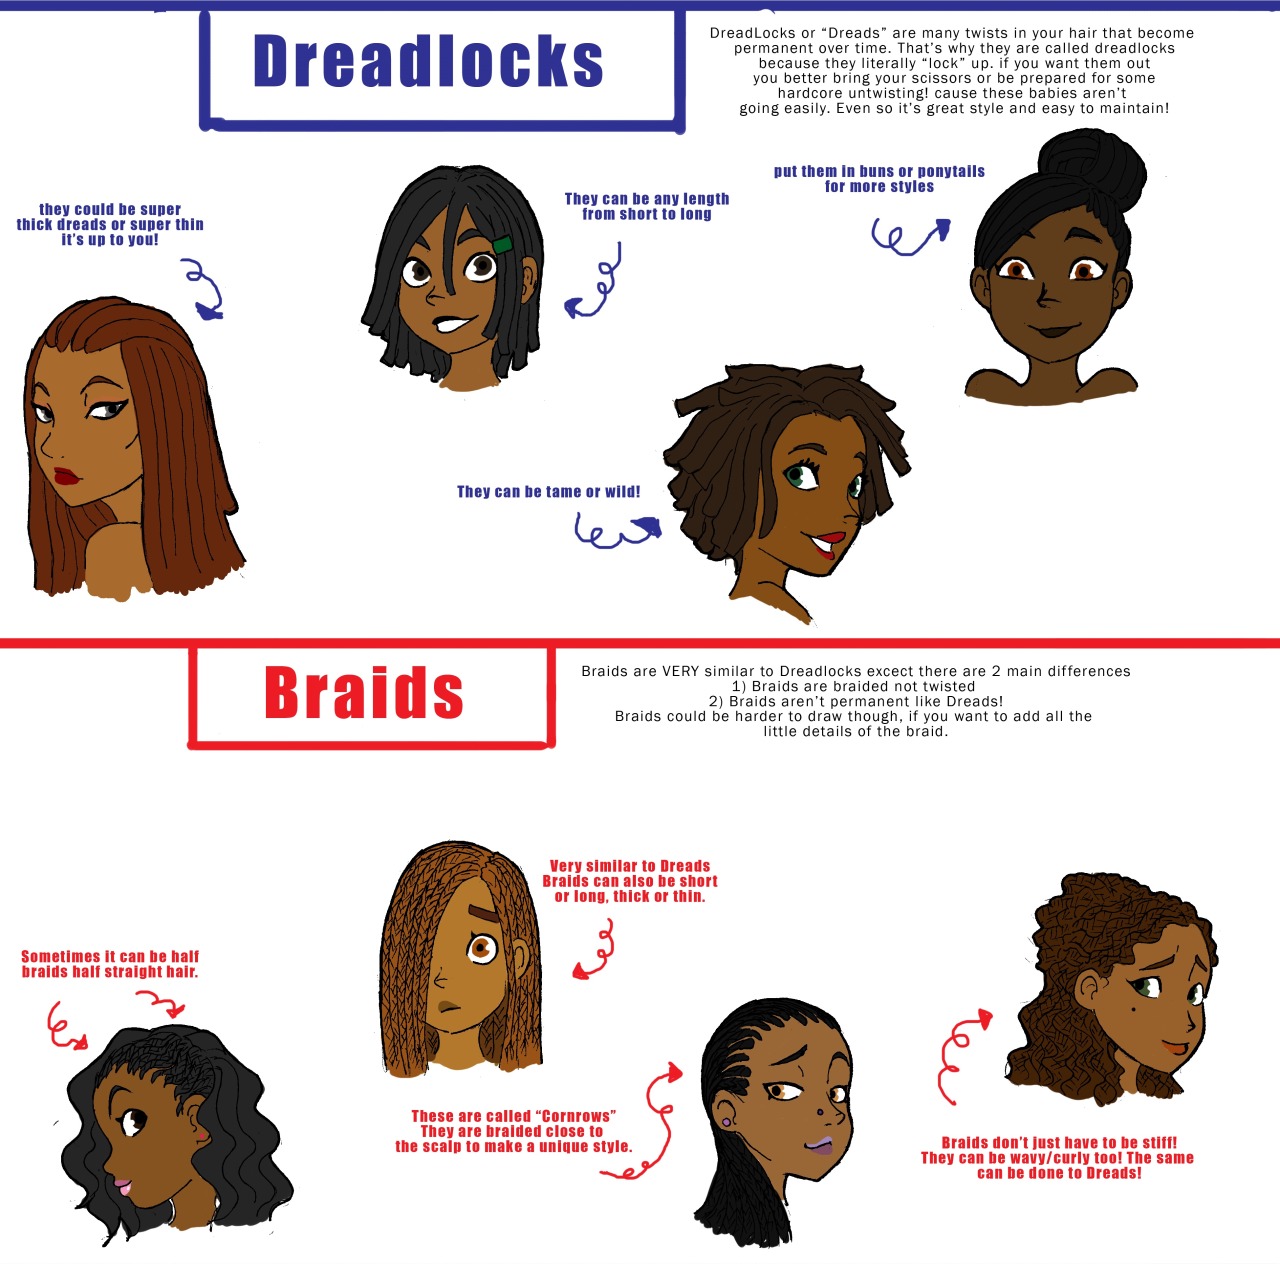
There's some qualities to hair you'll want to consider while you're drawing too. First and foremost, think about the shape(s), direction, volume, and weight of the hair and how gravity & other forces interact with it. Whether the hair you're drawing is dry, wet, straight, wavy, curly, coily, kinky, thin, thick, short, or long will affect that further. For example, short and curly hair is a lot more airy and not weighed down by gravity as much as long and straight hair.
Here's a hair tutorial by Ian McCraig that shows how straight hair can be affected by gravity:
Here's a hair tutorial by Ian McCraig that shows how straight hair can be affected by gravity:
Kinky and coily hair can actually be way longer than it looks, it's just so tightly wound that it has a springy quality and defies gravity. Curly, coily, and kinky hair straightens out when you pull on it, but only curly hair tends to be straight or wavy when wet. Coily and kinky hair usually keeps its shape when wet.
Some of this probably seems super obvious, but if you don't observe it, you just might not think about it. I didn't know how hard it is for thin, straight hair to stay in a braid until someone with thin and straight hair asked me to braid their hair. So always observe and seek to learn more about the hair you're drawing! You can learn a lot if you look up hair type charts and descriptions.
ActionKiddy on Deviantart has a really nice introduction to black hairstyles if you don't know much about it and need a jumping off point. It's important to keep in mind that some hairstyles are protective for certain hair types and destructive to others.
For more advice on drawing hair, check out Character Design Reference's hair board on Pinterest.
Just like when you're drawing hair, you'll want to group elements and think in terms of hair locks more than hair strands as you paint. Try to work big to small, starting with the overall shape of the hair, and think of hair as a ribbon (light shines across it). With hair that has more of a flat surface, that might mean one large highlight that stretches across the form. Curly and wavy hair is a little more complicated because the light gets broken up more, only hitting the highest point of curls/waves. James Gurney has a wonderful blog post explaining how you can think of hair as a ribbon more in depth. I highly recommend giving it a read.
Here's a step by step approach to painting hair:
- Block out the overall shape of the hair. Choose a base color that'll serve as your midtone.
- Use a big, wide brush to block in areas of shadows (or highlights), grouping the hair together to simplify it.
- Same as step 2, but block in highlights (or shadows) instead. If the hair you're trying to capture isn't shiny or there's nothing to reflect, you can skip this.
- Go back in with a smaller brush to refine shapes and add details.
This is when you can better capture the texture of the hair and add flyaway hairs. It's definitely a stylistic choice, but I wouldn't skip it if you're ever aiming for realism. Be careful not to add too many strands, though, so your hair doesn't look stringy.
There's a bunch of things to consider while you paint hair. Shape, texture, volume, sheen, light direction, and light temperature are just some of them. Lighting, color theory, and just generally painting techniques are loaded topics in themselves so I won't dive into them in this post. If you're just starting out, it's okay to keep things simple and just focus on getting comfortable with the process first.
A suggestion for choosing colors:
When you pick out your midtone, highlight, and shadow tones, try to keep your whole color palette in mind. That might mean using a green-ish or blue-ish tint to highlight brown or blonde hair, or making the overall hue of brown hair more of a purple than red/orange, etc. Color is so relative, which makes it both really exciting and daunting. Have fun experimenting and try combinations that don't seem conventional! If it looks good, it works.
If you want a surefire way to make sure your color choices will work, just pick out a midtone and choose a lighter tint for the highlights and a darker shade for the shadows. Try to shift the hue and saturation a bit with each jump, too, however you feel works best.
A suggestion for choosing brushes:
If the hair you're drawing is textured or soft, consider using a textured or soft brush when blocking in your overall shape and/or adding shadows/highlights and flyaway hairs! I have a habit of sticking to one brush for most of a painting and I can end up with just hard or soft edges, but varying your use of hard and soft edges can make your art more interesting and better capture your intentions.
Here's a wonderful example of Loish using a soft brush to capture how fluffy the character's hair is!
A textured brush can also be really useful when you're painting an undercut or buzzed hair.
A textured brush can also be really useful when you're painting an undercut or buzzed hair.
Designing Hair
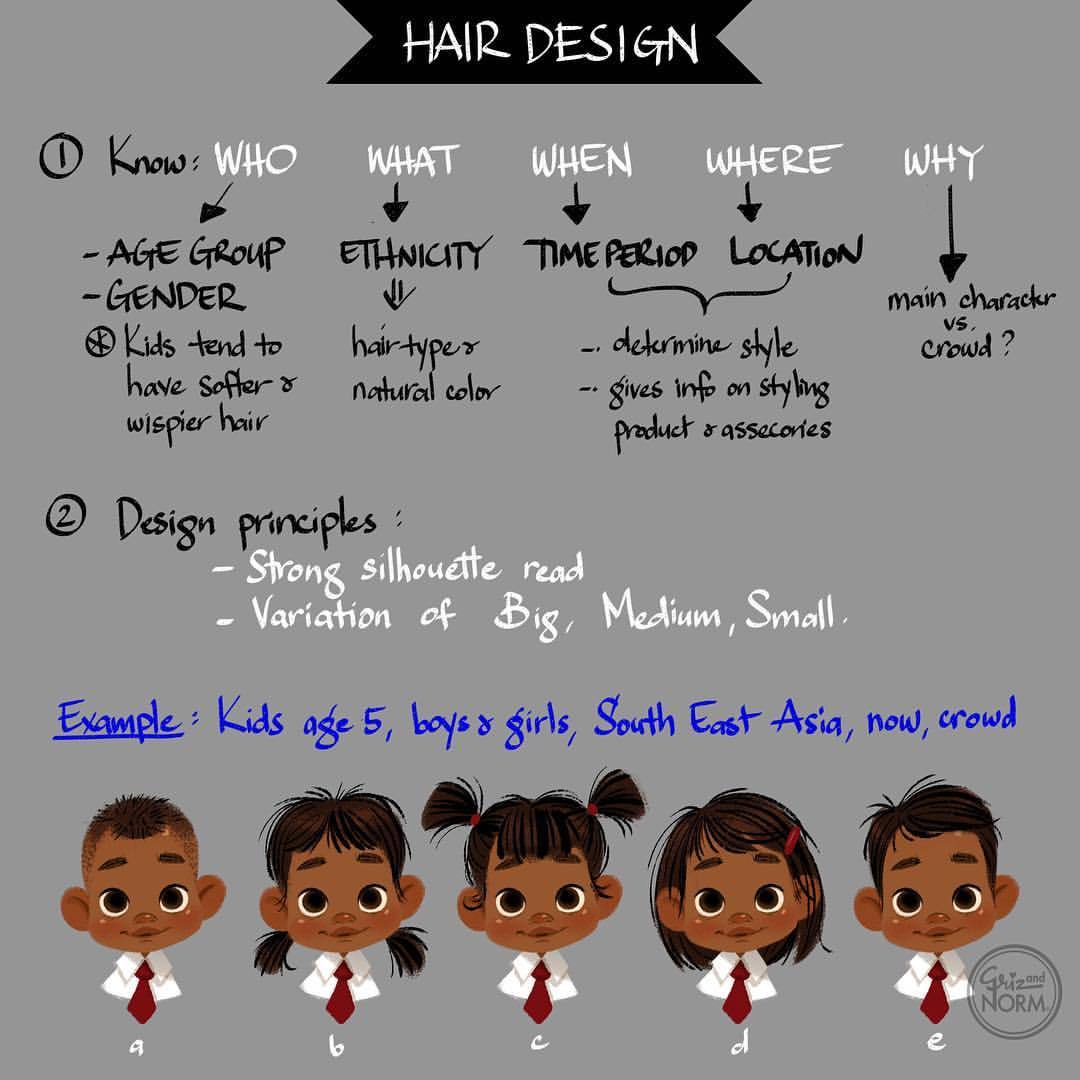
The last subject I want to touch on is designing hair for characters, with an emphasis on how to think about it more than the technique you should use. All of the design decisions you make should answer a question about your character's personality, and hair is pretty crucial to our identity. Consider how your characters interacts with and feels about their hair.
A good place to start when you design hair (or anything) is to research and find references that describe what you envision. You'll especially want to research if there's a cultural or historical significance to your character's hair. (Consider looking up the hair types I mentioned earlier). When you're ready to sketch, try creating more than one iteration of their hair design. You could end up liking the first one most anyway, but you just might discover an idea you didn't consider at first!
As you can see, my final suggestion is to try designing from a silhouette. You could jump straight into painting a silhouette or start with a sketch and then refine the silhouette in color. I did the latter for this example. Creating a strong silhouette for your character helps make them more distinct. If you like to have interesting shape language in your art, this is especially a good idea. Honestly, I'd heard about designing clear silhouettes since I first started learning to draw but didn't really start using them until 6 months ago. Now I've found them to be really helpful in brainstorming and finalizing designs.
Putting it All Together
Here's a character I made inspired by an image I found on pinterest from Merothebarber. Maybe it'll give you some ideas on how you can use photo refs to further study hair!
Hair isn't even close to being my strongest point in art, but all of these resources have been a tremendous help. I hope you've found my cheatsheet for hair helpful too! While I didn't include any links in this post to beauty sites or videos, you really will improve when you watch hair in action and learn about it in context.
If there's another topic you'd like a cheatsheet about or something you'd like to see me write about in the future, please leave your suggestions in the comments below!
Links included in this post:
Maybe your character likes long hair so they can hide behind it, or maybe they like it because it gives them the freedom to try out many different hairstyles. Maybe they much prefer the low maintenance of short hair. Maybe they got bangs because their crush told them it'd look nice and now they hate it, so they always have their bangs pushed back with a hairband until they grow out. They might have a lot of fun accessorizing their hair. Their hair could be messy and out of place because they're always thinking and scratching their head, or they might mess with it out of nervous habit. Maybe their hair is very significant to their journey and story arc, like in the case of Prince Zuko in Avatar the Last Airbender. Whatever you do, remember story/character is king.
Griz & Norm's Hair Design Tuesday Tip (follow the link to read Griz's advice!)
A good place to start when you design hair (or anything) is to research and find references that describe what you envision. You'll especially want to research if there's a cultural or historical significance to your character's hair. (Consider looking up the hair types I mentioned earlier). When you're ready to sketch, try creating more than one iteration of their hair design. You could end up liking the first one most anyway, but you just might discover an idea you didn't consider at first!
As you can see, my final suggestion is to try designing from a silhouette. You could jump straight into painting a silhouette or start with a sketch and then refine the silhouette in color. I did the latter for this example. Creating a strong silhouette for your character helps make them more distinct. If you like to have interesting shape language in your art, this is especially a good idea. Honestly, I'd heard about designing clear silhouettes since I first started learning to draw but didn't really start using them until 6 months ago. Now I've found them to be really helpful in brainstorming and finalizing designs.
Putting it All Together
Here's a character I made inspired by an image I found on pinterest from Merothebarber. Maybe it'll give you some ideas on how you can use photo refs to further study hair!
Hair isn't even close to being my strongest point in art, but all of these resources have been a tremendous help. I hope you've found my cheatsheet for hair helpful too! While I didn't include any links in this post to beauty sites or videos, you really will improve when you watch hair in action and learn about it in context.
If there's another topic you'd like a cheatsheet about or something you'd like to see me write about in the future, please leave your suggestions in the comments below!
Links included in this post:
- ActionKiddy's African Girl Hairstyles reference
- An example of kinky and coily hair's length
- ArtisticFlux's Feminine Hairstyles board (photo ref)
- ArtisticFlux's Masculine Hairstyles board (photo ref)
- Character Design Reference's hair board (drawing and painting hair)
- Glen Keane's art of Rapunzel (hair interaction)
- Griz & Norm's Hair Design Tuesday Tip
- Griz & Norm's Hair Tuesday Tip
- Ian McCraig's hair tutorial (straight/wavy hair)
- James Gurney's "Hair: The Ribbon Secret" (painting hair)
- Loish's fluffy hair example
- Merothebarber (photo ref or a fresh cut)
- My hair drawing tip
- My Hair Refs board








Discover 2.Oh! Hair Colour for Women, offering a variety of shades that cater to every style and preference, ensuring your hair looks stunning and healthy. Checkout Hair Colour for Women Thank you
ReplyDeleteYour take on the subject is wonderful. I personally fully agree with your opinion. Hope to read more on this topic to increase my knowledge in this field. Natural Biotin Shampoo for Hair Growth & Thinning Hair.
ReplyDelete